HOW TO PAINT A COMMA STROKE STEP-BY-STEP
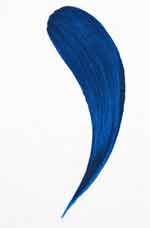
The comma stroke is one of the most common brush strokes found in decorative painting. It’s the very first thing we’ve taught hundreds of our students. Even though many painters lament its worthiness, we know for a fact that it’s one of the best ways to teach brush control. As a beginner or an experienced painter, it’s never too late to perfect this stroke.
But as they say, “different strokes for different folks” … (but we know in the end that perseverance pays!) Mastering this stroke is a skill that will help you in all other areas of painting.
Typically, a beginner painter will learn this stroke by using a #3 or #4 round brush. But the comma stroke can be done with flats, liners and filberts. A very versatile stroke indeed!
As a general overview, we’d like to suggest that you review our brush stroke basics , if you haven’t done so already.
Now, just follow along as we go through the...
...basics of painting comma strokes.
- After wetting and blotting your brush, check the ferrule for any droplets of water and blot these too.
- Be generous with the paint when you’re loading the brush. On your palette, firmly stroke the bristles towards you, staying in the same blending area. This keeps more paint on the brush.
- It’s important that you coat all the hairs with paint, even the ones
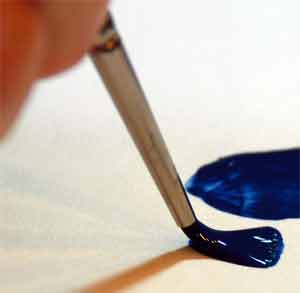
in the middle of the brush. Press down so the bristles fan out, being careful not to sit on the heel of the brush. Turn the brush over and blend the other side. If you need to pick up more paint go ahead and continue to blend well.

Although a little awkward at first, it’s generally easiest to position the side of your hand on your surface, with the pinky extended. Hold the brush comfortably somewhere on the ferrule, with the handle perpendicular to the surface.
 If you’re starting a stroke that will curve to the right, position the tip of the brush so it points to the upper left. This is usually the easiest direction for right-handed people.

Conversely, if you’re starting a stroke that will curve to the left, angle the brush tip towards the upper right.
Press and flatten until the hairs spread to give you a nice round beginning to your comma. Gradually guide the brush along while curving into a comma shape and gently letting up on your pressure as you go. As you near the end of the stroke, the brush should be vertical, ending up on the tip before you lift off.

A good stroke, like the one that appears on the left, has a nice full, round beginning that gradually curves and tapers to a sharp point at the end.
Try not to white knuckle it too much! And realize you’ll have to do lots and lots of these strokes before you begin to get the hang of it. Give yourself a break and try to relax. Breathe.
A bigger brush will give you a bigger stroke. But the size can also be controlled by the amount of pressure. That is, a #3 round can give you a very small stroke with a little pressure and small movement … or a much larger one with lots of pressure, a longer stroke and a more gradual release to the point.


Here you can see comma strokes done with a flat, and a filbert brush.
 A slight variation on the comma is the straight vertical comma stroke. This stroke is done the same way, except that there is no curve. Giving a tiny twist at the end of the stroke ensures a nice pointed tip.
So have fun and enjoy the process.
Let's leave Comma Stroke and go to Tole Brush Strokes.
Return to our Decorative Painting Home Page.
You Can Paint These Trees and More
Get Your Video Course Now
Introductory Price
Save 55% plus
a Money Back Guarantee
Site Search
| site search by freefind | advanced |
You Can Paint These Trees and More
Get Your Video Course Now
Introductory Price
Save 55% plus
a Money Back Guarantee




New! Comments
Have your say about what you just read! Leave me a comment in the box below.