Painted Light Bulb
Santa Ornament
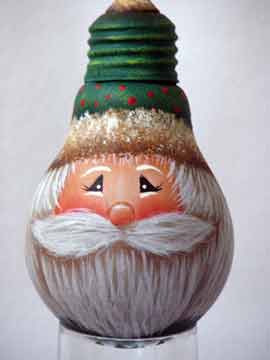
A painted light bulb… a lot of you keep asking for it, so here it is! We hope you enjoy this free and original Santa design by Jodi Clerke.
Don't miss this...
Have you seen our latest Glass Painting Pattern?
Why not create beautiful hand painted gifts this year?
Not only can you get going on Christmas early, but you can feel good about recycling at the same time.
If you’re like us, you’ve probably got lots of old light bulbs lying around, especially if you’re switching to the new energy efficient kind.
Who would have thought that a painted light bulb could be so green? David Suzuki would be proud!
We’ve included handy step-by-step directions and helpful photos to guide you along. What a great idea to paint up a bunch and give as gifts!
It's easy to create a painted light bulb!!
Here’s a list of paints and supplies you’ll need to get you started.
PAINTS
DecoArt Americana
Black Green
Burnt Sienna
Burnt Umber
Camel
Country Red
Dark Pine
Driftwood
Honey Brown
Lamp Black
Light Buttermilk
Medium Flesh
Olive Green
OTHER SUPPLIES
Americana Multi-Purpose Sealer
small sheet of Styrofoam or cardboard box
assorted cosmetic sponges
plastic food wrap (optional) or tracing paper
white and dark graphite paper
scissors
pencil
white chalk pencil.
INSTRUCTIONS
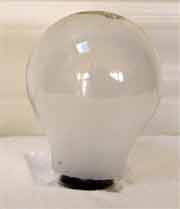
Before you do a painted light bulb, it’s always best to clean them with soap and water, then dry them well. We suggest you brush or sponge the entire light bulb with a coat of Multi-Purpose Sealer. This will provide some tooth for the paint to adhere to.
GREAT TIP #1
Make a hole in a cardboard box or piece of Styrofoam to hold the light bulb while it dries. Much better than having to occupy a hand while frantically waving it around in the air, don’t you think?
We’ve used a cosmetic sponge to dab on the sealer/paint, since it gives great coverage and some texture. No need to wet your sponge first, just dip into the paint, dab a bit on palette and then onto surface. You’ll need to give the entire bulb a coat of Driftwood, then allow to dry.
Because of the light bulb's curves, transferring the design can be a bit tricky, so take your pick from these options. If you trim the excess tracing paper away and use the scissors to notch here and there, it’s easier to wrap the pattern around. Some people like to trace the design onto plastic wrap with a marker, which can then be shaped to fit around the bulb. And of course, there’s always the ever-popular option of “winging it” by drawing directly on the surface :o)
GREAT TIP #2
Some of your lines may still need to be adjusted. That’s where the white chalk pencil comes in handy to fix re-align any areas that are a little wonky!
The main lines to transfer are the hat brim, face and moustache. Using a brush or sponge, basecoat the face with Medium Flesh and the hat Dark Pine. The hat brim and pom pom (knub at the top) are Honey Brown.
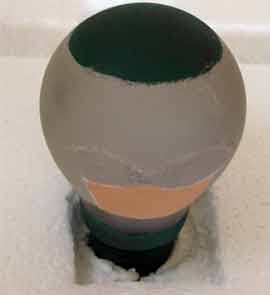
Next, fully load a 2-inch circular sponge dauber with Dark Pine, center it over the bottom of the bulb and press. Why? Well, since our Santa doesn’t have a neck, this gives something for his beard and hair to blend into, plus the green is repeated from the hat, which helps make a better design.
This little painted light bulb project is coming along very nicely!
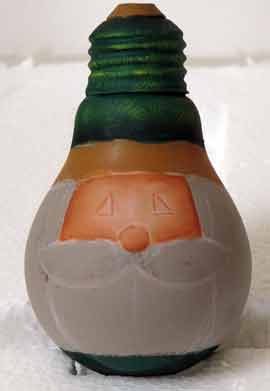
Transfer facial features and all separations in moustache, hair, and beard. Touch up Driftwood basecoat at base of his beard where it overlaps onto the green area.
Use a liner to add fine lines of Burnt Sienna to outline nose and eyes. Shade face next to hat brim, sides of face, next to moustache and bottom of nose with Burnt Sienna.
Add blush to bottom of cheeks and nose by floating with soft Country Red over previous Burnt Sienna floats.
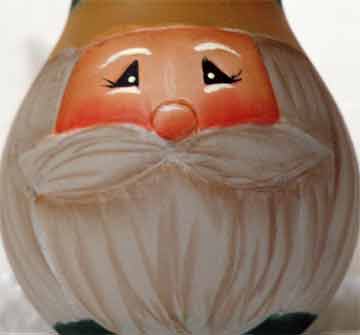
Use liner to paint eyes Black, adding a couple of fine eyelashes at the outer corners.
Place a highlight dot in the lower inner corner of each eye with Lt. Buttermilk.
Using Lt. Buttermilk, dab in eyebrows, stroke in a highlight under each eye and also top of nose.
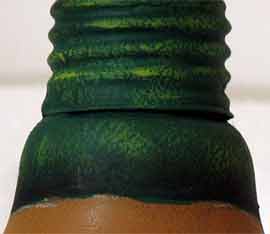
Drybrush hat with a mix of Dark Pine + Olive Green, catching the ridges on the metal area, plus here and there on rest of hat; also dry brush highlight on lower circle.
Shade outer edges of lower circle and next to pom pom and hat brim with soft floats of Black Green.
When the painted light bulb is done, and you're happy with everything, dot the hat and lower circle with Country Red.
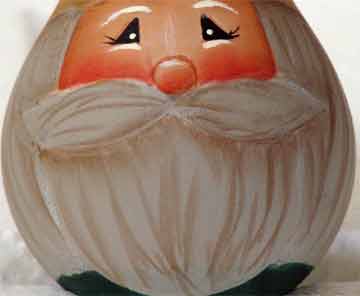
Shade his hair with Burnt Umber next to hat brim, using chisel edge to create some dark streaks.
Also shade next to his moustache and on either side of beard, streaking some more and add some Burnt Umber lines on moustache working from center out to each side.
With a comb filbert, rake brush or filbert wisp and slightly thinned Lt. Buttermilk paint, stroke in hairs working from top down making sure to brush some onto his face,forehead and lower circle.
Again, moustache hairs are brushed from the center out.

With your favourite stippling brush, pounce Burnt Umber along the bottom edge of the hat fur and around the outer edge of the pom pom.
Pounce Camel, then Camel + Lt. Buttermilk along the top edge of brim and center of pom pom.
And finally, allow to dry and spray with your favourite varnish.
Attaching a hanger to the painted light bulb can be a bit tricky. If you have an ingenious plan, go for it! Otherwise, try this:
You’ll need 3 lengths of ribbon, raffia or metallic stretch cord: 1 for wrapping around the metal portion and 2 lengths to loop through the first one. You’ll probably also need an assistant so you don’t have to wrestle too much with your Santa.
Cut the 1st length about 7”. Cut the other 2 lengths about 10”.
Wrap 1st length loosely around base of metal portion, without tying, then feed 1 end of other 2 lengths inside 1st on either side of santa’s hat.
Tie 1st length securely at back of hat and cut off any excess.
Take end of 2nd length and pull through until even with its other end, forming a loop, positioning on 1 side of hat. Repeat on other side.
Now pull these 2 loops taut and tie together in a knot or bow, cutting off any excess.
Tip: You may need to dab on some clear-drying glue to keep your ties in position.
We hope you enjoy your free Santa painted light bulb project! And feel free to share this page withh all your painting friends!
***READER TIP***
Better Hanging Solution!
From Donna Wessel from St. Louis, MO, USA:
For hangers on light bulbs I have used an ice pick (or awl) to poke a hole through the metal screw top on either side and then threaded a piece of wire, leather, ribbon, etc. to form the hanger.
Works great and you don't have to worry about the ribbon or string slipping off the twisty part and the bulb dropping to the floor.
In cases where a sock, or knitted glove finger is used for the hat (glued on, of course) the ribbon or thread can be put through the knitted fabric eliminating the need to poke a hole.
Just a couple suggestions for your tip file.
Thank you Donna!
Line Drawing
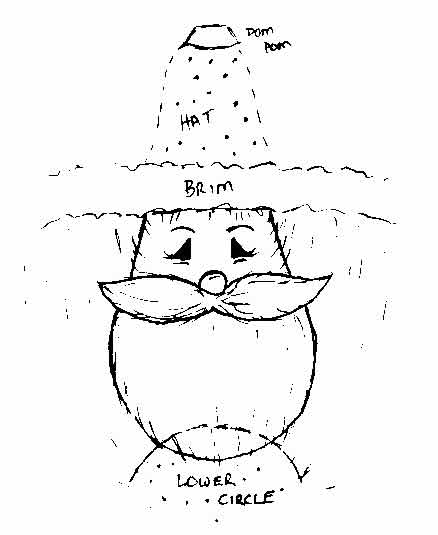
To print the line drawing for the painted light bulb, simply "right-click" on the mouse and select "print image" or "print picture". Or "right-click" to "save the image as" on your computer where you can then print it.
You may need to do a little size adjustment depending on the bulb shape and size.
Feel free to use the design on other surfaces...it's more than just a painted light bulb project... it's cute as can be on a gourd too.
That's it for this lovely little project. Want to find out what else is on our site?
Return from Painted Light Bulb to our Decorative Painting Home Page.
You Can Paint These Trees and More
Get Your Video Course Now
Introductory Price
Save 55% plus
a Money Back Guarantee
Site Search
| site search by freefind | advanced |
You Can Paint These Trees and More
Get Your Video Course Now
Introductory Price
Save 55% plus
a Money Back Guarantee




New! Comments
Have your say about what you just read! Leave me a comment in the box below.